
Turns out I was right. Back in my Afterbirth release article I mentioned how even after a few hours I could confidently say that this is an excellent piece of DLC, and now, some 20 hours of play later I can even more confidently restate that.
The Binding of Isaac: Afterbirth is in my eyes the best kind of expansion/DLC, it adds new features and improvements to the base game without ruining what made the base game good. Every aspect of gameplay has received some improvement, from simple things such as new items, room layouts and enemies which shake up the usual flow of a run to more obvious additions like the new greed mode and daily challenges.
This does however mean that if you did not like The Binding of Isaac: Rebirth then Afterbirth won't be changing your mind any time soon, but for the rest of us this is one solid expansion.
Items and synergies
Out of all the new stuff added in Afterbirth perhaps the most influential are the hundred or so new items as well as the reworked item synergies. In Rebirth most people gave certain items (little planet, soy milk, etc.) a wiiiiiiide berth because they either made your life miserable or they simply removed whatever cool effect you had going on and replaced it with their own. With Afterbirth this issue is mostly fixed as there are now a lot more item synergies that can work to your benefit even if the items that go in to the combo are weak or annoying on their own.
For example, in Rebirth if you had Brimstone (an item that allows you to belch a laser beam across the room!) new combo items that you picked up would most likely not give you a benefit but would almost always give you their negative effect which resulted in people simply avoiding interesting albeit slightly sub par items in fear of destroying their existing or future synergies. Now, in Afterbirth, you can pick up some crazy combos.
On my second run as Azazel I found My Reflection (Tears fire a smaller distance and then return to you), Rubber Cement (your tears, or in this case laser, bounce off the wall), one of those wiggling worms that curve your shots, and finally Tammy's Head (an item that fires your tears in all directions).
In the base game this combo would be powerful but boring since only Tammy's Head worked with lasers. But in Afterbirth it might be the most ridiculous thing I've seen in a while. With each use of Tammy's Head I would turn in to what I can only describe as a Kraken, with my laser tentacles spreading across the room flailing at anything in their path, completely obliterating rooms within seconds. And this is just one example of fun new synergies you can build, obviously not all are going to be game-winning but they will be there to make gameplay interesting over multiple playthroughs.
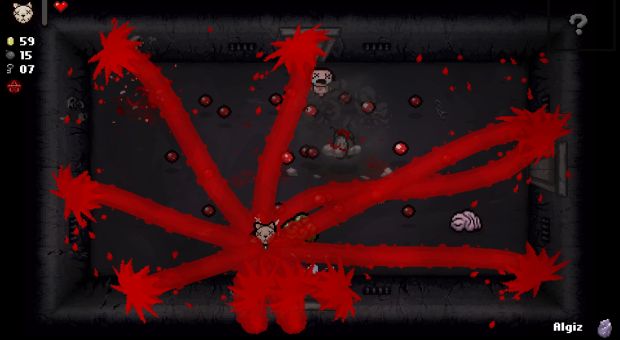
The combo without Rubber Cement, I may or may not have blew myself up with Bob's Brain shortly after getting it
While on the topic of items its worth mentioning that despite not actually being nerfed, the devil room deals are now on average less powerful because your odds of getting tier 1 items have gone down with the addition of new ones, many of which are strong but not strong enough to allow you to breeze through the game on their backs alone. Intended as a nerf or not I think this was a step in the right direction because devil room items have the tendency to homogenize a run but given their power level you always felt obligated to go for them.
On the other spectrum of divine dealings, the angel rooms, besides the new items have gotten a very needed buff in the form of infinite chests. These chests seem to seem to contain a decent amount of consumables (and potentially items?) and can be re-open as many time as you're willing to spare keys.
Obviously the only times I've ever gotten to see them has been with a handful of keys to my name so I can't say for certain how influential they will be but anything that might push people towards the angel route every once in a while is a welcome addition, especially since there are now item rewards for defeating Mega Satan who requires key pieces from them.
New enemies and layouts
If you think the new item combinations make the game easier then the Afterbirth enemies and room layouts are here to remind you that this is not the case. Enemies are mostly variations of the current ones with their danger factor turned up a few notches. So the standard slow moving zombies you might see on the later floors (the ones you have to hit in the back) now have a chance to spawn as demonic zombies which don't just slowly shamble around, they run at you while leaving creep behind resulting in some rather unpleasant situations if you get stuck in close quarters with them.
The bosses have received similar treatment. There are now colored versions of old bosses which work in a +/- sort of fashion, the boss gains an ability or extra enemies during the fight but loses health, damage or some other effect.
The scariest of these recolored bosses from what I've seen so far is the gray (blue?) haunt which comes with 4 little haunts that attack you at the same time. If you thought fighting the haunt on floor 1 was hard then you haven't seen anything yet. To be fair I'm not sure if he can spawn on earlier floors since I've only ever met him in the chest/dark chest but I wouldn't be surprised, this is Isaac after all, your delicious tears fuel it.
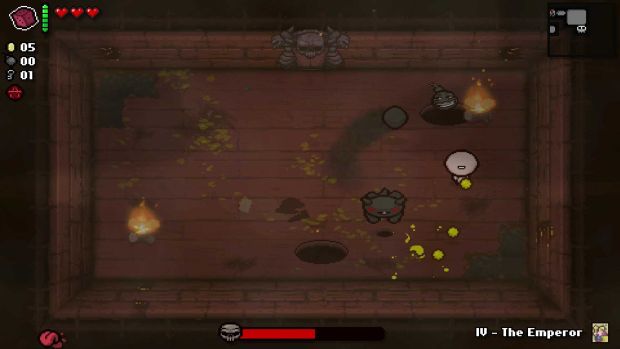
A new early boss and an eyeless Isaac
Naturally there are actual new bosses as well, my favorite of which would be The Hush, a new optional boss you can fight after the Mom's Heart fight. You can guess how strong the boss is just by the fact that before you fight him you have 4 golden chests and 2 item rooms, with a choice of items inside, just standing there in the open. And if you guessed very hard you are on the right track but you are thinking way too small.
The Hush is insanely hard but not actually unfair in its difficulty, the whole fight plays out like a shoot 'em up game with the boss tossing a colorful pattern of tears your way and you being forced to find the time to shoot at him in between dodges. It is possible to go through the entire fight without getting hit just by playing well enough (or in the case of me in the video by having a halo of flies).
While I don't see myself going for him often after I've unlocked all the items from him I like him being there as an extra challenge for those super powerful characters, much like how doing boss rush feels like a victory lap after you've build some destructive combo.

The Hush shooting out his rainbow of death
The changes to the level design come on two fronts, the new room shapes which allow some for some completely different encounters to take place and the added level variations such as the burning basement or the dank depths (the wet type of dank) which serve to increase the diversity of the stages.
From what I've noticed the new level variations appear randomly and are usually harder than their normal counterparts. In the burning basement quite a few enemies are lit on fire which seemingly makes them more durable as well as aggressive, huh, maybe I haven't given this fire thing a good enough try, I'll let you know how it goes.
Sadly some of the difficulty comes from graphical issues rather than gameplay, especially in the case of the burning basement. If you get unlucky and end up with the curse of darkness and the burning basement you pretty much have to go in to the options and raise the gamma or you won't be able to see anything due to the dimmed light and smoke effects. I really do hope this gets fixed as soon as possible because I can imagine it being nightmarish for people who aren't as skilled in "cheat with gamma"-fu.
On the other hand, while room layouts don't actually change enemies the different room sizes and shapes definitely have an effect on how powerful enemies can be. Small tight rooms can make attack flies go from a mild annoyance to massive threat, long narrow corridors seem designed to support exploding enemies, L shaped rooms can make entering the room a tactical decision on its own right since you don't want to show up in the middle of all the enemies and so on.
To counterbalance this new rise in monster power Afterbirth has made it so that big rooms (the really big ones) give two charges to your space bar item rather than one, which is a most welcome change.
Greed mode and daily challenge
If you ever thought the standard Isaac run takes far too long then Afterbirth has you cowered with the new greed mode and daily challenge.
The daily challenge, as the name would imply, is a pre-set seed that changes on a daily basis and is shared across all Isaac players who then compete to be the very best, like no one ever was, on the leaderboard. Your position on the leaderboard is determined by the items you've taken, the rooms you've explored, how much damage you received and naturally how fast you've finished the run.
I didn't think I would enjoy this mode very much but since you can only do it once per day it presents a fun way to test out your Isaac skills without investing a lot of time, which as it turns out is something I was up for.

That sweet, sweet rank 9039
However, greed mode I was almost certain I would enjoy. It is essentially a faster more action packed version of Isaac where you have to weigh risk against reward in order to get through it with the biggest payout and least health lost.
In greed mode you start in an arena surrounded by a item room that requires a key, a free item room, a curse room and a shop. The item rooms ensure that you have a baseline level of power but it is the shop that is the focus of greed mode. Since enemies don't drop health you'll have to use the coins they drop to restore yourself while still somehow saving up enough money to buy the shop items which draw from the entire pool of items (devil and angel items included). And if you aren't happy with the shop selection you can usually pay a couple of coins to have them re-rolled.
As far as the actual gameplay is concerned, it all starts when you step on the switch in the middle. Once pressed you will spawn 8 waves of enemies, a new wave will come either after a set timer (which is shorter than you expect) or after you've cleared out all of the current enemies ensuring constant frantic action.
If you find yourself overwhelmed (or simply clumsy) you can walk over the switch in the middle again and take a bit of damage in order to stop the monsters from spawning until you step on it again. Its not something you want to do often because every point of damage you take is going to cost you between 3 and 5 coins to fix.
Finally, once you're done with the 8 monster waves you get to fight the two boss waves and after that optionally the devil wave. The devil wave is usually much harder than the bosses but rewards you with a guaranteed devil or angel room after completing it. From my numerous runs I've come to realize that its best to do the devil waves on the earlier floors and ignore them on the later ones because you will simply take too much damage from the nasties it spews at you.
At the culmination of the greed mode is the Ultra Greed fight, one of the better animated and more fun bosses to fight. He is hard but no where near the Hush, which makes sense since you will probably meet Ultra Greed with relatively low health.

If Ultra Greed has time for squats so do you
The fight, as you might imagine, revolves around coins. Besides simply throwing them at you Ultra Greed's eyes periodically turn in to a slot machine and if two of the same symbols appear the room will be littered with corresponding coins. These are either key, heart, or bomb symbols and each one of those is dangerous.
The keys, if left alive for long enough, will open the doors at the sides of the arena unleashing dozens of little greeds at you, and you really don't want that. The hearts are the least problematic, if left alone they will heal Ultra Greed up but the heal isn't that significant so if you're going to skip out on dealing with any of these make it hearts. And finally the bomb coins, these are fairly annoying since they are far more numerous than the other two, and as you would imagine, not dealing with them leads to a whole lot of explosions.
The hunt for secrets
And once you defeat Mr. Ultra Greed you're presented with the chest (which ends the game) and a donation machine whose purpose is so far undiscovered. Interestingly though, the donation machine caps out at 109 coins which just so happens to be the item ID for money = power...that isn't fishy at all.
This, combined with the fact that the community has so far only discovered about 50 or so items and are yet to find the extra late-game floor, has started a massive hunt for secrets that doesn't seem to be easily solved with data mining this time around. Whatever it ends up being its always exciting watching people try out absurd and obscure methods of killing themselves in Isaac in hopes of finding a clue of some sort.
Verdict
The new items and item combinations have brought a fresh breath air in to the game. Items that were once absolutely awful now have a few synergies that can make them quite powerful. To offset this increase of power Afterbirth has added more challenging enemies and room layouts which produce some very tense moments in to what otherwise would be standard room to room progression.
The two new game modes, greed mode and the daily challenge, are a great boon to players that wanted a more compact, action orientated version of Isaac. They have their own strategies and metagame which differ from what you would usually do and this helps the variety of Afterbirth a fair bit.
To finish this off I'll just repeat what I've said in the beginning, this is an excellent piece of DLC. It doesn't change the game drastically but offers enough new things (and combinations of old things) to keep the game fresh and interesting for a whole while longer. And with its relatively low price Afterbirth is a great deal for people that enjoy Isaac or roguelikes in general.